How To Tie A Cravat
Tying a cravat is very easy if you already know how to tie a tie. Don't worry if you've never done this before - the videos and images below will help you achieve the cravat tying skills you're looking for. For the scrunchie wedding cravat effect, see the tying instructions towards the bottom of the page.
| Wedding Cravats | Day or Casual Cravats |
Tying a Casual Cravat (Version 1)
Tying a Casual Cravat (Version 2)
Tying a Scrunchie / Wedding Cravat
How to Tie A Cravat
TYING A CASUAL OR WEDDING CRAVAT - STEP BY STEP
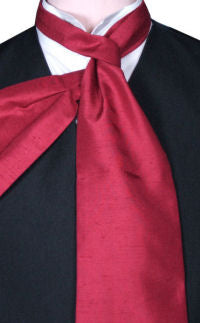
The process for tying a casual cravat and the traditional wedding cravat is very similar, except with the casual cravat you're looking to create a puffed out look, whereas the wedding cravat tends to be smooth and flat.
 |
Step 1. Hang the cravat around your neck with one end slightly longer than the other. |
| Step 2. Wrap the long end across the front of the shorter end. | 
|
 |
Step 3. Contine wrapping the long end around until you have one complete loop around the top of the short end. |
| Step 4. Start going round again, but as you get to the back of the loop, thread the long end up over the top of the loop from behind. | 
|
 |
Step 5. Pull the long end all the way through over the loop until it's hanging down the front. Tuck all the fabric behind your waistcoat for a wedding cravat, or into your open collar shirt for a casual or day cravat. |
BUYING CRAVATS
Now that you have tying a cravat all sorted, it's time to get really creative. Bright colours and eye-catching designs are best for day cravat use, and for more serious or formal events like weddings, plain coloured wedding cravats is the best bet. Whatever you choose, be flamboyant, after all that's what cravats are all about!